The Live Dashboard in Allele is a powerful tool that enables educators to effectively manage their classroom, whether in-person, hybrid, or fully online. This guide provides a detailed overview of the features and functionalities of the Live Dashboard, helping you leverage it to maximize student engagement and performance.
The Live Dashboard is accessible in a Teach space where you have appropriate permissions as an Owner, Teacher, or TA.
Overview of the Live Dashboard
The Live Dashboard is designed to give real-time insights into student progress and performance within any module of your course. Whether you are running a synchronous or asynchronous session, the dashboard offers actionable data and controls to help you monitor, assess, and guide students through your content.
Key Features of the Live Dashboard
-
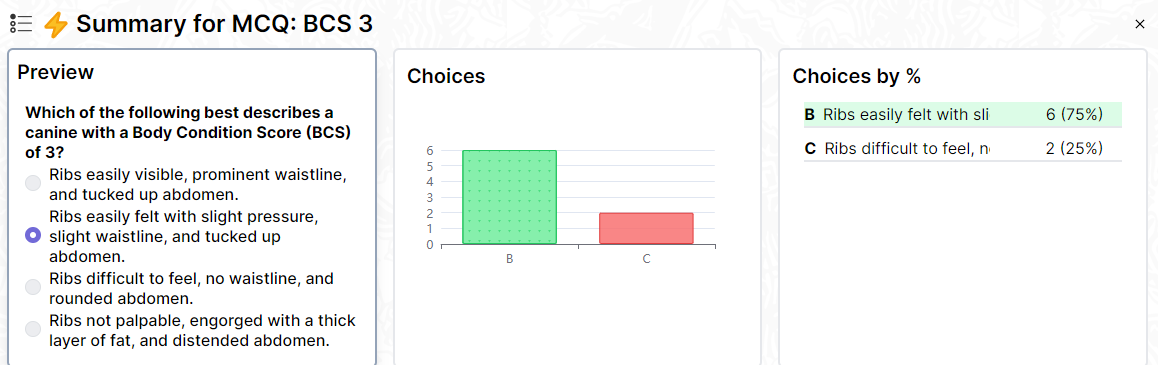
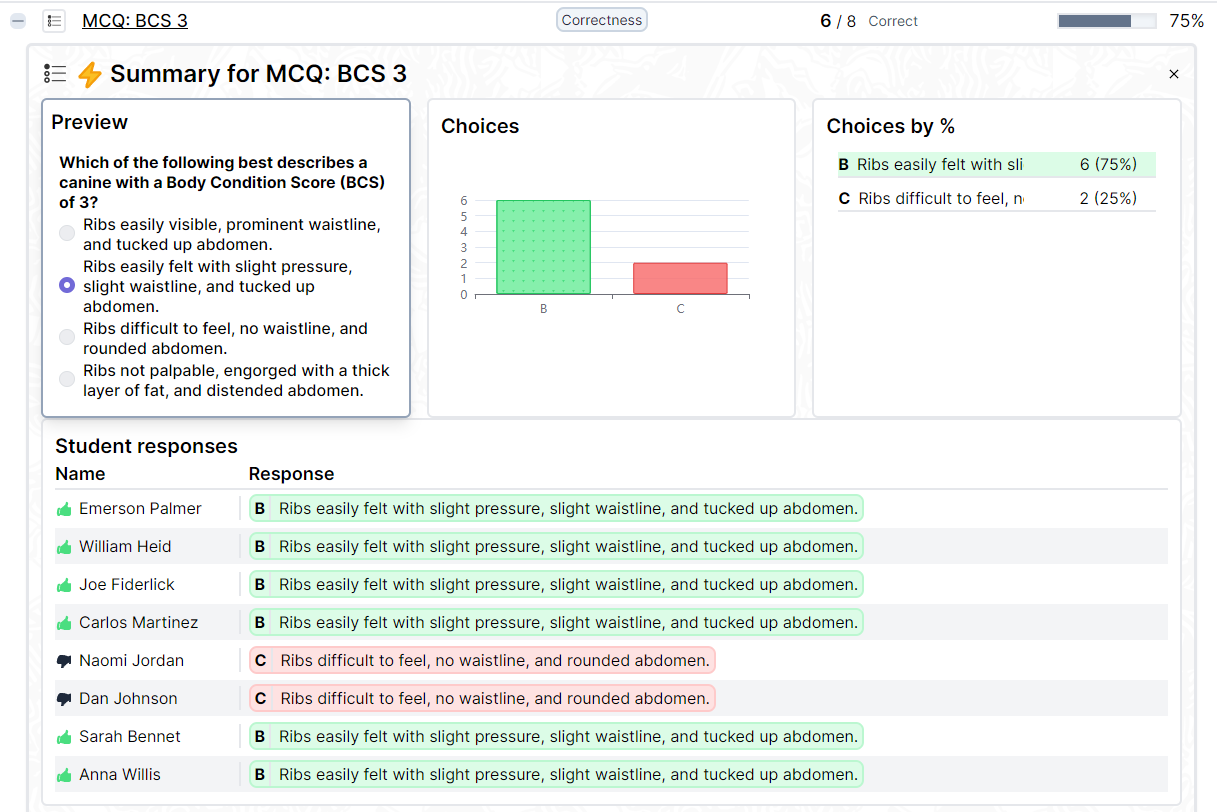
Real-Time Student Data and Analytics
The Live Dashboard provides continuous, up-to-the-second data on how students are interacting with assessments, quizzes, and other activities within the module. You’ll have access to:-
Real-time insights: As students submit their answers, you can view individual and team responses immediately.
-
-
Aggregate analytics: Data is aggregated to give you a high-level view of overall class performance, helping you identify patterns such as common misconceptions or trends in student understanding.
-

-
Detailed question analysis: You can drill down into any question to see specific student or team responses. This helps you identify which students might need additional support and which teams are excelling.
-
-
-
Completion State Monitoring
The dashboard also provides a clear view of the completion state for each student within the current module:- Individual progress tracking: Monitor where each student is in the module, helping you ensure that no one is left behind.
- Team-based tracking: If working in groups, the dashboard allows you to track the progress of each team as they work through assessments or interactive activities.
- Completion percentages: For a quick view, you can see what percentage of students have completed each phase of the module, making it easy to decide when to move on to the next activity.

-
Orchestration Controls
In addition to analytics, the Live Dashboard provides several orchestration controls that allow you to manage and control the flow of your class in real-time. These options can be found under the “Controls” tab on the Live Dashboard.
-
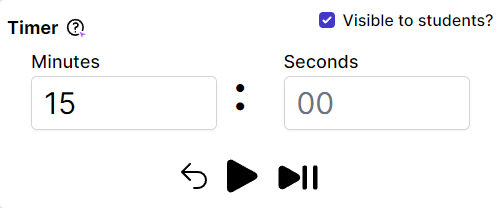
Phase Timer: The phase timer is a vital tool for pacing your class. You can set a timer for any activity or phase, and when time runs out, the system automatically advances or locks students from further input.
-
-
Pause & Lock Feature: When you pause the timer, students’ screens will be locked in real-time, preventing them from continuing until you are ready to proceed. This is useful when you need to clarify instructions, review answers, or reset the pace of the lesson.
-
Visible to students?: When selected, students will see the timer on the bottom of their screen.
-

-
-
Advance Students: You can manually advance all students to the next phase or activity within a module, giving you full control over when to move the class forward. This ensures everyone is working on the same content and progressing through the module in sync.
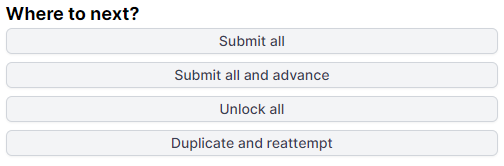
- Submit all: Immediately submits the phase for all students. This action does NOT move the students ahead to the next phase.
- Submit all and advance: Immediately submits the phase for all students and forcibly advances them to the next phase.
-
Duplicate and reattempt: If students are struggling with an assessment, the Duplicate and reattempt option allows you to clone a specific activity and give students another chance to submit their answers. The duplicated phase will be placed directly after the original phase.
-
Unlock Phases: You can unlock specific phases of the module to ensure students are only working on the parts you want them to.
- The Unlock all action is typically used in synchronous settings when a teacher or facilitator wants the entire class to gain simultaneous access to an Allele phase.
-
How to Use the Live Dashboard Effectively
To make the most of Allele’s Live Dashboard, follow these best practices:
-
Monitor Student Data Frequently
Use real-time analytics to adjust your teaching in the moment. If the majority of the class is struggling with a particular concept, pause the phase and review it with them before moving on. -
Keep an Eye on Completion States
Ensure students are progressing through the module at a steady pace. If some students are falling behind, use the Live Dashboard to provide targeted support or extra time. -
Use Orchestration Controls to Maintain Flow
When applicable, balance the pace of your class with the phase timer, ensuring that all students stay on track. Lock and unlock phases as necessary to ensure no one gets ahead or falls behind.